

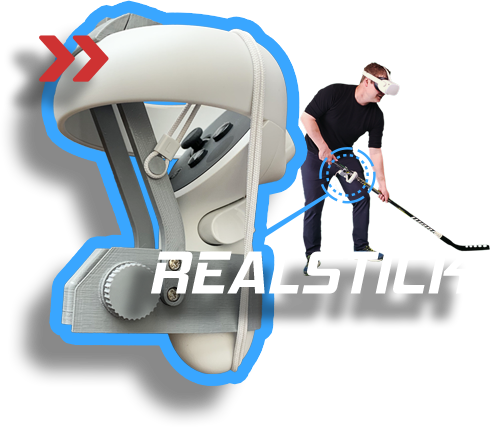
RealStick easily clips onto your controller and secures it to any hockey stick, making your shots more accurate with a natural feel.
*Available for Oculus Rift S / Quest 1, Quest 2 & Quest 3 / 3S.
*Not required to play.

CAD $14.99
Guides
Assembling RealStick
Quest 2
- Locate and use the left Oculus touch controller. The left controller features the menu button with 3 lines (hamburger icon).
- Slide the controller handle into the oval shaped ring by first stringing the controller strap through the loop. The controller’s ring should cover the “melcher.ca” lettering and with gentle force, snap onto the clip.
- Bring the controller strap around the right side of the controller and around the controller’s ring and back through the inside of the ring. There should be just enough slack to hook the strap onto the small hook on the top of the RealStick attachment.
- To attach to a hockey stick, slide the butt of the stick through the front of the controller ring so that the hockey stick slides across the tops of the buttons of the controller. Turn the controller in place to snap the stick into the two clips.
- Do not let go of the attachment. It can still slide up and down the stick. Slide the attachment to about 1 foot away from the butt of the stick to allow for room for your hands on the stick. Tighten the screw knob on the side of the stick clip to secure the attachment in place.
Quest 3
- Loosen the screw on the side of the RealStick enough for the clamp to open up.
- Now that the clamp has been loosened. Place it on the shaft of the stick. When you do this, make sure the opening for the controller is facing in the same direction as the blade of the stick.
- Once you have placed it in the desired position, tighten the screw to clamp the RealStick onto your hockey stick.
- Locate and use the left Oculus touch controller. The left controller features the menu button with 3 lines (hamburger icon).
- Slide the controller into the RealStick attachment, with the controllers buttons facing towards the ceiling. If you are unsure, compare the button cutouts on the attachment to the buttons on the controller for the correct orientation.
- Do not let go of the attachment. It can still slide up and down the stick. Slide the attachment to about 1 foot away from the butt of the stick to allow for room for your hands on the stick. Tighten the screw knob on the side of the stick clip to secure the attachment in place.
Using RealStick in Game
- Once you have your left controller mounted on a real hockey stick you can load up the game. You will not need the other controller to play with RealStick. You can place the right controller in a safe place where it will not be hit.
- Once the game loads into the main menu, the gloves and stick in game will likely not match with the real stick you are holding. It may look like it is pointing off to the side, this is because we need to do a quick one- time setup to enable and calibrate RealStick mode. We have created a simplified way of doing this using just the real hockey stick. When you are in the main menu, tap 3 times on the ground with the stick. The taps must be hard enough to register with the controller and fast enough to count together. When the game detects that you have tapped 3 times in a row it will switch to ReaStick mode and automatically start RealStick calibration.
- RealStick calibration will tell the game where the controller is on the stick so that the real hockey stick and VR stick visually match. When in calibration you will see a screen with instructions. Place the blade of your real stick on the real ground and hold the stick still. A progress bar will appear above your stick. After two seconds the calibration will be complete and the blade of the VR stick should roughly match where the blade of the real stick is.
- You can calibrate again or enable/disable RealStick mode by navigating in the game to the settings screen and selecting “Calibrate” or toggling the RealStick checkbox respectively.
*The RealStick adapter is not a product of Oculus or Facebook LLC. It was designed and tested to be safe and reliable. However, we are not responsible for any damage to Oculus controllers or surroundings while using RealStick.